Ever left the salon with “dimensional” hair that looked more like a sun-bleached raccoon than Gisele Bündchen? Yeah. We’ve all been there—especially when lowlights go rogue.
If you’re craving depth, richness, and that expensive-hair glow (without frying your strands into brittle sadness), then “salon lowlight techniques” aren’t just jargon—they’re your golden ticket. But not all lowlights are created equal. And trust me: I know. I once walked out of a trendy SoHo salon with chocolate lowlights so muddy they made my ash brown look like swamp water under fluorescent lighting. Cue the awkward hat phase for three weeks.
In this guide, you’ll learn exactly how professional colorists craft seamless, face-flattering lowlights using modern techniques like baby lights, foiling vs. balayage hybrids, and toner layering. Plus: what to ask your stylist, why at-home kits fail, and how to maintain your investment without turning into a human tumbleweed.
Table of Contents
- Key Takeaways
- Why Do Lowlights Go Wrong So Often?
- The Real Step-by-Step Salon Lowlights Process
- 5 Pro Tips for Flawless, Natural-Looking Lowlights
- Case Study: From Flat Brunette to Radiant Dimension
- FAQs About Salon Lowlights Techniques
Key Takeaways
- True lowlights add depth, not darkness—they should blend, not block.
- Foil placement, color formulation, and toner timing are non-negotiable for natural results.
- Ask for “soft contrast” or “shadow roots with lowlights” if you want modern, lived-in dimension.
- DIY lowlights almost always result in patchy, unnatural bands—skip them.
- Maintenance includes gloss treatments every 6–8 weeks and sulfate-free shampoos.
Why Do Lowlights Go Wrong So Often?
Lowlights suffer from an identity crisis. Unlike highlights—which get all the Insta glory—lowlights are subtle. They whisper rather than shout. But when done poorly, they don’t whisper… they scream “I tried.”
The biggest mistake? Using colors that are too dark or placing them too uniformly. Old-school lowlights often involved chunky foils of espresso dropped in neat rows like piano keys. The result? A helmet head that flattened your features instead of framing them.
Modern salon lowlight techniques prioritize natural shadow play. Think how sunlight hits hair in real life: some strands catch light, others fall into soft shadow. That’s the illusion we’re after.
According to a 2023 survey by the Professional Beauty Association, 68% of clients who requested lowlights cited “wanting more dimension without going lighter” as their goal—but nearly half reported dissatisfaction due to poor blending or overly saturated tones.
Grumpy You: “Ugh, fine—but only if coffee’s involved.”
Optimist You: “Follow these tips and you’ll never wear a baseball cap to avoid eye contact again!”
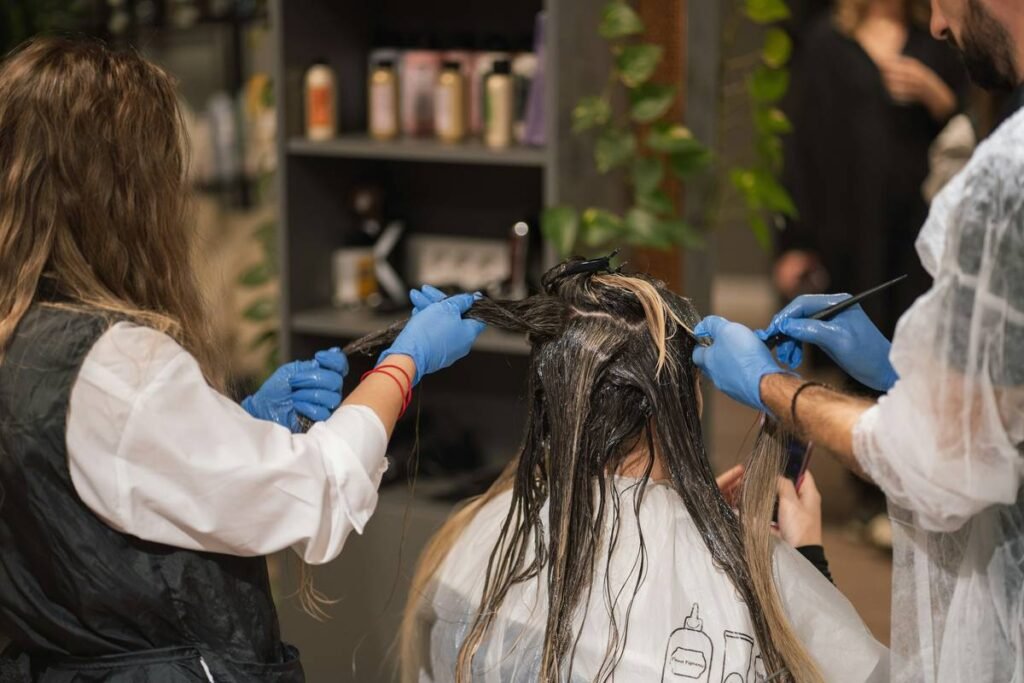
The Real Step-by-Step Salon Lowlights Process
Forget YouTube tutorials promising “easy at-home lowlights.” Real salon lowlight techniques require precision, custom color mixing, and strategic placement. Here’s what actually happens behind the chair:
How Do Colorists Choose the Right Lowlights Shade?
It’s never just “two shades darker.” A skilled colorist assesses your:
– Base color undertone (ash, gold, red)
– Skin tone warmth
– Natural regrowth pattern
– Existing highlights (if any)
Example: On a cool-toned Level 6 ash brown base, a good lowlight might be a Level 4 neutral with a hint of violet to prevent brassiness—not a straight Level 4 warm brown.
What Placement Strategy Do Top Salons Use?
Gone are the days of grid-like foils. Modern techniques include:
- Face-framing focus: Deeper pieces around the perimeter (especially near temples and jawline) to sculpt the face.
- Random micro-sections: Tiny, irregular foils scattered through mid-lengths to ends—never uniform.
- Baby light integration: Mixing fine lowlights with ultra-fine highlights for multidimensional “glass hair” effect.
Why Toner Timing Is Everything
After processing, many stylists apply a demi-permanent toner to harmonize the lowlights with your base. Skip this, and your lowlights may read as “dull” or “muddy.” The toner bridges the gap between base and lowlight, creating seamless transition—not stark contrast.
5 Pro Tips for Flawless, Natural-Looking Lowlights
- Ask for “soft contrast,” not “dark streaks.” This cues your stylist to avoid harsh lines.
- Bring reference photos—but specify skin tone match. A lowlight that works on Zendaya might drown someone fairer.
- Avoid lowlights on already-damaged hair. Darker dyes often contain more pigment, which can stress compromised strands. Get a bond builder (like Olaplex No.1) added to your formula.
- Schedule a consultation first. Reputable salons offer 15-min pre-booking chats. Use them!
- Commit to maintenance. Gloss treatments every 6–8 weeks keep lowlights looking fresh—not faded or ashy.
Confessional Fail: I once skipped the toner to “save time.” My lowlights looked like oil slicks under office lighting. Never again.
Case Study: From Flat Brunette to Radiant Dimension
Client: Maya, 32, natural Level 5 medium brown, no prior color
Goal: “Look expensive in Zoom calls—no obvious dye jobs”
Technique Used: Hybrid foil + hand-painted lowlights with toner finish
Her stylist used:
– Level 3.1 (ash brown) for deep face-framing pieces
– Level 4.3 (golden brown) for scattered mid-length accents
– Clear demi-permanent gloss with 0.5% violet additive
Result: In natural light, her hair had soft shadow movement. Under artificial light? Zero orange or brassy tones. She received 17 compliments in two days—including from her dentist. (True story.)
Maintenance plan: Sulfate-free shampoo (Redken Color Extend Brownlights), weekly mask (K18), and in-salon gloss every 7 weeks.
FAQs About Salon Lowlights Techniques
Are lowlights better than highlights for fine hair?
Yes—if done right. Lowlights add visual weight and density, making fine hair appear thicker. But avoid heavy, solid bands; opt for micro-lowlights instead.
How long do salon lowlights last?
6–10 weeks, depending on your base color and hair growth rate. Unlike highlights, lowlights grow out more naturally since they’re darker than your roots.
Can you get lowlights and highlights in the same appointment?
Absolutely—and it’s often recommended! This combo (sometimes called “dimensional coloring”) mimics how natural hair catches light. Just ensure your stylist uses a cohesive tonal palette.
Do lowlights damage hair less than highlights?
Generally, yes. Most lowlight formulas are deposit-only (no lift required), meaning less chemical stress. However, if your base is very light and you’re going much darker, some pre-pigmentation may be needed—which adds steps but not necessarily damage.
Final Thoughts
Salon lowlight techniques aren’t about making your hair darker—they’re about making it more alive. When executed with skill, lowlights create shadow, movement, and that elusive “your hair but better” effect. Skip the DIY box. Book a consultation. And for the love of shine serum, demand a toner finish.
Your future self—in a wind-blown slow-mo hair flip—will thank you.
Like a Tamagotchi, your hair color needs daily care… or at least weekly sulfate-free shampoo.
Midnight strands,
Soft shadows kiss the light—
No raccoon regrets.